
33 Wall Art Ideas to Transform Every Blank Wall in Your Home
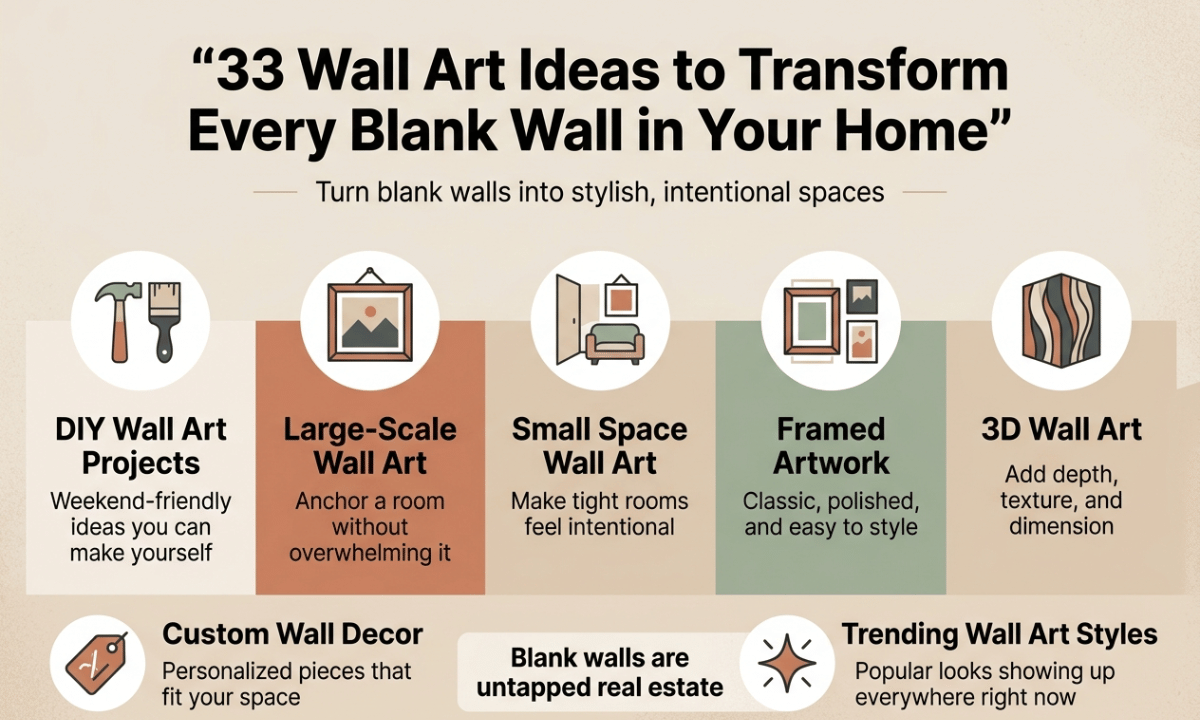
Blank walls are basically untapped real estate, and most people have no idea where to start. This list is for homeowners, renters, and anyone mid-refresh who wants their space to actually feel like them without spending a fortune or hiring a designer.
Inside, you’ll find a mix of DIY wall art projects you can knock out on a weekend, tips for choosing large-scale wall art that anchors a room without overwhelming it, and smart picks for small space wall art that makes tight rooms feel intentional instead of cramped. You’ll also get ideas for framed artwork, 3D wall art, custom wall decor, and the trending wall art styles showing up everywhere right now.
Scroll through, grab what fits your space, and make those walls work for you.
Transform Blank Walls with Framed Artwork
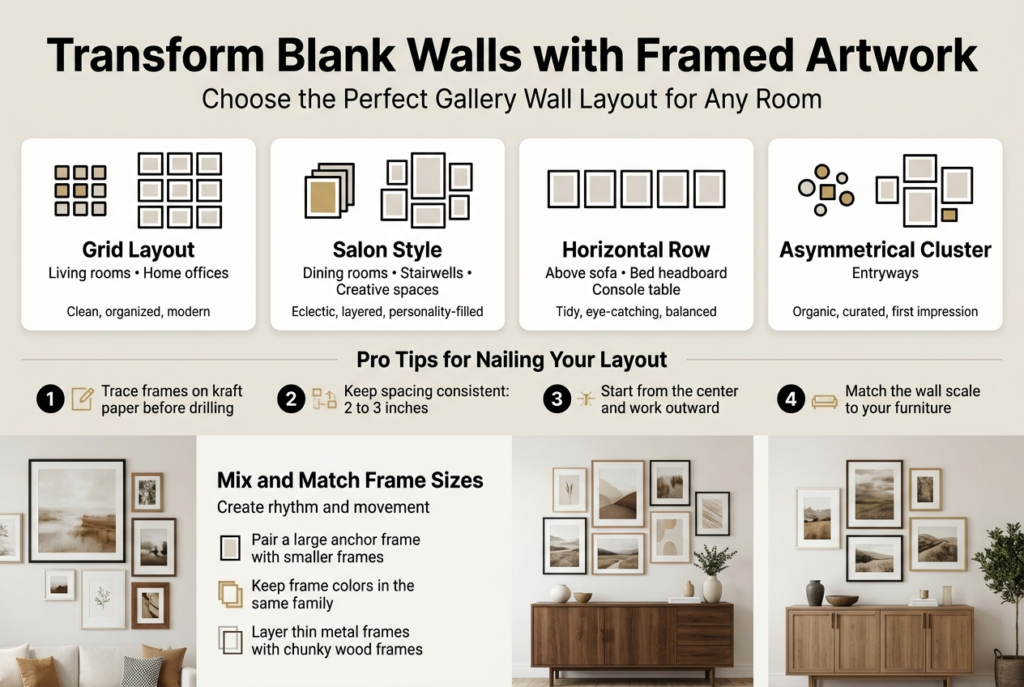
Choose the Perfect Gallery Wall Layout for Any Room
Getting your gallery wall layout right is the difference between a wall that looks intentional and one that looks like an afterthought. Before you hammer a single nail, spend some time thinking about the shape of your wall and the furniture sitting beneath it.
Here are the most popular gallery wall layouts and where they work best:
- Grid Layout – Perfect for living rooms and home offices. Evenly spaced frames in matching sizes give off a clean, organized vibe. Great if you love a modern or minimalist aesthetic.
- Salon Style – This is the eclectic, layered look where frames of all shapes and sizes fill the wall edge to edge. It works beautifully in dining rooms, stairwells, and creative spaces where personality is the priority.
- Horizontal Row – A single horizontal line of frames works brilliantly above a sofa, bed headboard, or console table. It keeps things tidy and draws the eye across the room.
- Asymmetrical Cluster – Grouping frames loosely around a central anchor piece creates an organic, curated feel. This is ideal for entryways where you want to make a first impression.
Pro tips for nailing your layout:
- Trace your frames on kraft paper, cut them out, and tape the templates to the wall before drilling anything.
- Keep consistent spacing between frames — 2 to 3 inches is the sweet spot for most rooms.
- Start from the center and work outward, especially for symmetrical layouts.
- Match the scale of your gallery wall to the scale of your furniture. A tiny cluster above a massive sectional sofa will look lost.
Mix and Match Frame Sizes for a Stunning Visual Effect
One of the easiest ways to make your framed artwork for walls look like it was styled by an interior designer is to stop buying frames in just one size. Mixing frame sizes adds rhythm and movement to a wall, making it feel alive rather than flat.
The key is to mix intentionally, not randomly. Here’s how to pull it off:
Play with Scale Contrast
Pair a large statement frame — think 24×36 inches — with several smaller 5×7 or 8×10 frames around it. The big piece becomes the anchor, and the smaller ones create conversation around it without competing.
Stick to a Cohesive Color Palette for Frames
Even if your frames are all different sizes, keeping them in the same color family ties everything together. Try:
| Frame Color Combo | Best Room Match |
| All black frames | Modern, industrial, or minimalist spaces |
| Mix of black and gold | Glam or transitional living rooms |
| Natural wood tones | Bohemian, Scandinavian, or farmhouse rooms |
| White and off-white | Bright, airy bedrooms and nurseries |
| Eclectic mix of colors | Creative studios and playful kids’ rooms |
Layer Different Frame Profiles
A thin metal frame next to a chunky wooden frame adds texture and depth. This works especially well when you’re combining photography with paintings or prints — each piece gets its own moment.
Don’t Forget Negative Space
Resist the urge to cram frames together. Breathing room between pieces actually makes each one stand out more. Give your eye somewhere to rest, and the whole wall will feel more considered.
Use Black and White Photos for a Timeless, Elegant Look
There’s something about black and white photography that never goes out of style. It strips a moment down to its bare bones — light, shadow, emotion, and composition — and what’s left is pure.
If you’re looking for home wall decoration ideas that feel polished and timeless without following any particular trend, a black and white photo wall is one of the most reliable options you’ll find.
Why black and white works so well on walls:
- It pairs with virtually any color scheme, from bold jewel tones to neutral palettes
- It creates a cohesive, gallery-quality look even when mixing very different subjects
- It makes personal photos feel artistic rather than just documentary
- It can make a small room feel more sophisticated without overwhelming it
How to curate a black and white photo wall:
- Choose a unifying theme — travel shots, family candids, architectural details, or nature close-ups. Mixing themes works if the editing style is consistent.
- Edit consistently — Use the same preset or filter across all photos so they feel like a collection rather than random shots.
- Vary the subject distance — Mix wide landscape shots with tight portrait crops to create visual variety.
- Frame them simply — Thin black frames or simple white frames let the photos breathe. Avoid ornate frames that compete with the simplicity of the images.
One particularly stunning approach is to take a series of black and white portraits of each family member and display them in matching frames along a hallway. It’s personal, it’s artistic, and guests always stop to look.
Display Meaningful Family Portraits That Tell Your Story
Family portraits on the wall aren’t just decoration — they’re a statement about what matters most to you. Kids who grow up seeing their family represented on the walls of their home develop a stronger sense of belonging and identity. And for you, those images become a visual timeline of your life together.
The trick is displaying family portraits in a way that feels intentional and designed, not like a snapshot stuck to a fridge.
Tips for creating a family portrait wall that actually looks great:
- Invest in professional photography at least once — A professionally lit and composed family portrait is worth framing large. It becomes the anchor of your gallery wall and elevates everything around it.
- Mix candid shots with posed portraits — Candid moments (kids laughing, a quiet morning coffee together, a spontaneous adventure) tell the real story. Posed portraits give you the polished version. You need both.
- Update regularly — Swap out photos as your family grows and changes. A gallery wall that never changes becomes wallpaper. One that evolves stays meaningful.
- Include multiple generations — Old photos of grandparents or great-grandparents alongside current family shots create a sense of legacy and continuity that no store-bought art can replicate.
Framing ideas for family portraits:
| Portrait Style | Recommended Frame | Display Idea |
| Large posed family portrait | Wide wooden frame in walnut | Centered above living room sofa |
| Black and white candid shots | Thin black metal frames | Grid layout in hallway |
| Milestone photos (first day of school, birthdays) | Simple white frames | Staircase gallery going up |
| Vintage family photos | Ornate gold or antique frames | Clustered on a study or library wall |
| Travel family photos | Natural wood frames | Grouped on bedroom accent wall |
The best custom wall decor you’ll ever own is the kind that can’t be purchased anywhere — it’s the photo of your daughter’s first belly laugh, your family road trip through the mountains, or the quiet Sunday morning that somehow got captured perfectly. Get those images off your phone and onto your walls where they belong.
Elevate Your Space with DIY Wall Art Projects
Create Eye-Catching Abstract Art with Simple Paint Techniques
You don’t need a fine arts degree to make something stunning for your walls. Abstract art is honestly one of the best DIY wall art projects for beginners because there are no rules — and anything can work if you commit to it.
Here are some beginner-friendly paint techniques that deliver big results:
- Pour painting – Mix acrylic paint with a pouring medium, combine a few colors in a cup, and pour it slowly onto a canvas. Tilt the canvas to let the colors flow and swirl. Every piece turns out completely different, which makes each one genuinely one-of-a-kind.
- Tape resist art – Apply painter’s tape in geometric shapes or stripes across a canvas, paint over it, and peel the tape off when dry. The clean lines create a graphic, modern look that feels polished and intentional.
- Palette knife painting – Skip brushes entirely. Use a palette knife to spread thick layers of paint directly onto a canvas for a rich, textured finish that adds real depth and dimension.
- Watercolor washes – Wet your paper first, then drop in loose watercolor pigments and let them bleed into each other naturally. The unpredictability is part of the beauty.
Tips for Getting the Best Results
| Tip | Why It Matters |
| Use a large canvas (at least 16×20″) | Small pieces get lost on a wall; going bigger makes more of an impact |
| Stick to 3-4 colors max | Too many colors can look muddy; a limited palette looks cohesive |
| Match your color palette to your room | The art will feel like it belongs rather than looking out of place |
| Let each layer dry before adding another | Prevents colors from turning brown and keeps each shade vivid |
Once your piece is finished, frame it or hang it as-is with a floating canvas. Either way, it becomes a custom piece of home wall decoration that cost you next to nothing.
Turn Fabric and Textile into Gorgeous Wall Hangings
Textile wall hangings have made a massive comeback, and for good reason — they add warmth, softness, and a handmade feel that no print or canvas can replicate. The good news is that you can make one even if you’ve never worked with yarn or fabric before.
Macramé Wall Hangings
Macramé is probably the most popular textile wall art style right now, and it’s way more approachable than it looks. All you need is:
- Macramé cord (cotton rope works best)
- A wooden dowel or branch to hang it from
- Basic knots – the square knot and the lark’s head knot are all you really need to know
Start with a simple row of lark’s head knots across your dowel, then practice square knots in groups of four cords. Within a few hours, you can have a piece that looks like it came straight from a boutique home décor shop.
Fabric Scrap Wall Art
Got old fabric sitting around? Cut it into strips and tie or weave it onto a frame. Mix textures like denim, velvet, linen, and cotton for a layered, eclectic look that’s totally unique. This is also a great way to repurpose clothing or fabric scraps you’d otherwise throw away.
Woven Wall Hangings
Weaving sounds complicated, but a simple loom (which you can make yourself with a wooden frame and nails) makes it totally manageable. Weave in different colors and materials — yarn, ribbon, dried grass, feathers — and you’ll end up with a piece that has real visual interest and texture.
Why textile wall art works so well in a room:
- It softens hard walls and balances rooms with a lot of furniture
- The natural materials bring an organic, earthy feel
- It works beautifully in bohemian, Scandinavian, and farmhouse-style spaces
- It dampens sound slightly, which is a bonus in echoey rooms
Repurpose Everyday Objects into Unique Wall Decor
Some of the most interesting wall art ideas don’t start in an art supply store — they start in your garage, your kitchen, or even your recycling bin. Repurposing everyday objects into wall décor is creative, budget-friendly, and results in pieces that are completely yours.
Ideas for Objects You Can Hang on Your Walls
- Old window frames – Hang them as-is for a rustic, architectural feel, or add mirrors or chicken wire inside the panes to give them more function.
- Vintage plates and dishes – Arrange a gallery of mismatched vintage plates in a cluster. You can find them cheap at thrift stores, and the layered shapes and patterns look amazing together.
- Wine corks – Glue them into a frame in a pattern or random arrangement. It’s a fun conversation piece, especially in a kitchen or dining area.
- Wooden pallets – Sand them down, stain or paint them, and hang them as a rustic backdrop or use them as a base for adding hooks, shelves, or even small planters.
- Sheet music or book pages – Frame individual pages or arrange them in a grid without frames for a literary, vintage-inspired look. Dip the edges in tea for an aged effect.
- Bicycle wheels or gear parts – Industrial-style homes love these. Hang a single vintage gear or wheel as a statement piece.
- Embroidery hoops – Fill them with fabric, lace, or even photographs and hang a collection of different sizes together for a layered, whimsical display.
How to Make a Repurposed Object Gallery Wall
Planning a gallery wall with repurposed items takes a little thought to make it look deliberate rather than random. Try this approach:
- Pick a theme – Industrial, vintage, nautical, botanical — having a loose theme ties everything together.
- Vary the sizes – Mix large anchor pieces with smaller ones to create visual flow.
- Use a consistent color or finish – Spray painting a collection of different objects the same color (like matte black or white) instantly makes them look like they belong together.
- Lay it out on the floor first – Arrange everything before committing to nail holes so you can adjust the spacing easily.
- Add lighting – A small clip light or picture light can make even a simple arrangement look gallery-worthy.
Repurposing objects isn’t just a budget win — it tells a story. A wall full of things that have history and meaning creates a space that feels personal and lived-in, which is something no mass-produced print can match.
Make a Bold Statement with Large-Scale Wall Art
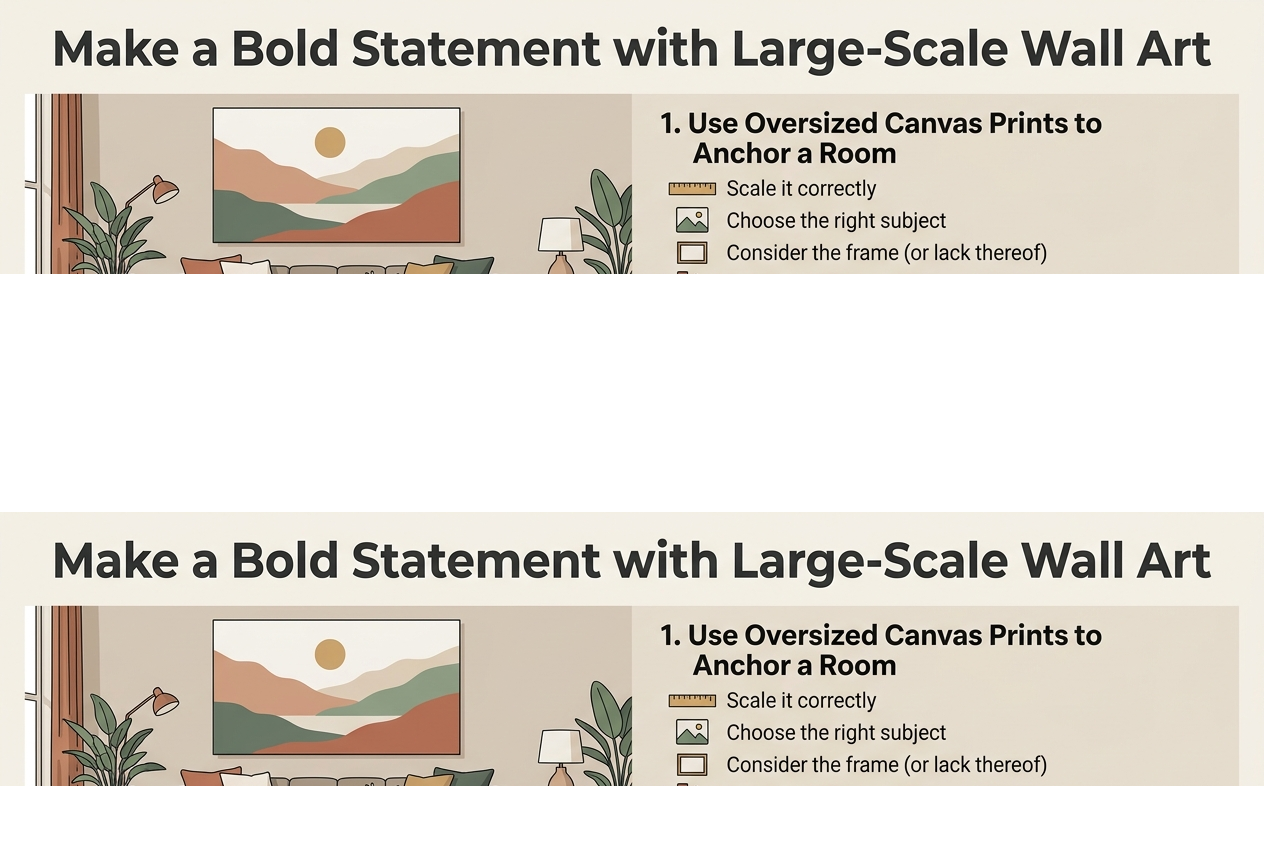
Use Oversized Canvas Prints to Anchor a Room Instantly
There’s something almost magical about walking into a room and immediately knowing where to look. That’s exactly what a large-scale canvas print does — it gives the eye a place to land and pulls the entire space together without needing a dozen smaller pieces scattered around.
When you’re choosing an oversized canvas, think about the mood you want to set. A massive black-and-white cityscape photograph feels completely different from a sweeping abstract painting in warm earthy tones. Both are stunning, but they tell very different stories about the room.
Some tips for getting it right:
- Scale it correctly: The canvas should take up roughly two-thirds to three-quarters of the wall width above a sofa or bed. Go smaller and it floats awkwardly. Go wider and it overwhelms.
- Choose the right subject: Landscapes, abstract art, botanical prints, and portraits all work beautifully at large scale. Bold colors and high contrast images translate especially well when blown up.
- Consider the frame (or lack thereof): Gallery-wrapped canvases with painted edges look sleek and modern with no frame needed. If you want something a little more polished, a simple floating frame adds definition without stealing the show.
- Mind the color palette: Your oversized canvas doesn’t have to match your room exactly, but it should share at least one or two tones with your existing furniture or textiles to feel cohesive rather than dropped in from another dimension.
Large scale wall art like this works especially well in living rooms, primary bedrooms, and open-plan spaces where blank walls can feel cavernous and cold. One strong piece solves that problem immediately.
Create a Dramatic Focal Point with a Single Statement Piece
Sometimes the boldest move you can make in a room is to stop filling every inch of wall space and instead commit fully to one powerful, oversized piece. This approach works particularly well in minimalist interiors, but it’s also a great way to bring calm and intentionality to a busier, more eclectic space.
A single statement piece doesn’t have to be a canvas. Think outside the box:
- A hand-painted oil painting in a dramatic gold frame
- An antique tapestry hung like a work of fine art
- A large woven fiber art piece with gorgeous texture
- An oversized vintage poster in a sleek modern frame
- A sculptural metal wall art piece that catches the light
What makes a piece truly “statement-worthy”:
| Quality | What to Look For |
| Size | Large enough to command attention — at least 36″ x 36″ for most walls |
| Visual weight | Bold colors, strong lines, or rich texture that reads from across the room |
| Emotional resonance | Something that genuinely speaks to you, not just what’s trending |
| Contrast with the wall | A light piece on a dark wall or a dark piece on a light wall always pops |
| Uniqueness | Original art, custom work, or vintage pieces feel more intentional than mass-produced prints |
Hang it at eye level — which is roughly 57 to 60 inches from the floor to the center of the piece. This is the gallery standard, and it works in homes just as well as it does in museums. Leave plenty of breathing room around the piece. White space isn’t wasted space; it’s what makes the art feel intentional rather than crammed in.
Try a Floor-to-Ceiling Mural for Maximum Visual Impact
If you really want to go big, nothing tops a floor-to-ceiling mural. This is the kind of home wall decoration idea that completely transforms a room — it doesn’t just decorate a wall, it changes the entire atmosphere of the space.
Murals have had a massive resurgence in interior design, and the options are better than ever. You don’t need to hire a professional painter (though that’s obviously incredible if it’s in the budget). Peel-and-stick wallpaper murals have come a long way and now come in genuinely beautiful, high-resolution designs that look custom and intentional.
Popular mural styles right now:
- Botanical and jungle prints — lush, maximalist, and endlessly dramatic
- Abstract color washes — soft, painterly, and surprisingly versatile
- Architectural murals — think arched doorways, faux windows, or classical columns for a trompe l’oeil effect
- Nature scenes — forests, mountains, misty landscapes, or ocean horizons
- Celestial maps — vintage star charts and moon phase murals feel timeless and artsy
Rooms where murals work best:
- Dining rooms: A mural behind a dining table creates an incredibly immersive, restaurant-worthy atmosphere
- Bedrooms: A mural on the wall behind the bed acts like a massive built-in headboard moment
- Entryways and hallways: Narrow, overlooked spaces come alive with a bold mural
- Kids’ rooms: Interactive, playful murals make a child’s room genuinely magical
- Home offices: A beautiful backdrop behind your desk makes video calls look amazing
If committing to a full room feels too intense, try a half-wall mural or apply it to a single accent wall. You still get the drama without the full room transformation.
Highlight Architectural Features with Oversized Typography Art
Typography wall art has been around for a while, but oversized typography — think letters that run nearly the full height of a wall — is in a whole different league. When it’s done well, it stops being decoration and starts being architecture.
Large-scale letter art, word installations, and neon or LED signs work brilliantly for drawing the eye toward parts of a room that deserve attention. A ceiling with gorgeous crown molding, an exposed brick chimney breast, a built-in bookshelf alcove — all of these get even more interesting when you pair them with bold typographic elements.
Ways to use oversized typography art:
- Metal letter sculptures: Three-dimensional letters mounted directly to the wall add shadow, depth, and serious texture. Great for home offices, libraries, or entryways.
- Wooden word art: Laser-cut wooden phrases in natural or painted finishes feel warm and personal. Popular choices are family names, coordinates of meaningful places, or single words like “gather,” “create,” or “breathe.”
- Neon and LED signs: These are the ultimate statement piece for a bedroom, home bar, or entertainment room. Custom neon signs have become much more affordable, and they add a warm, atmospheric glow that’s genuinely beautiful in the evening.
- Painted or printed typography: A massive typographic poster — think a single letter in an interesting font printed on an oversized canvas — is a simple, affordable version of this trend that looks surprisingly chic.
- Stenciled wall quotes: A longer quote painted directly onto a wall can be stunning when the font is carefully chosen and the placement is intentional.
Tips for making it feel elevated rather than cheesy:
- Stick to one or two fonts maximum
- Choose words or phrases that genuinely mean something to you — generic motivational quotes tend to feel less personal
- Keep the color palette restrained — a single color typographic piece almost always looks more sophisticated than a rainbow of colors
- Let the architecture breathe around the piece rather than crowding it with other decor
- Think about scale relative to the ceiling height — the taller the ceiling, the bigger you can go
Typography art is also a fantastic way to reinforce the personality of a specific room. A custom neon sign in a teenager’s bedroom feels completely different from carved wooden initials in a formal entryway — both are typography, but the style, scale, and material choices communicate entirely different things.
Add Texture and Dimension with 3D Wall Art Ideas
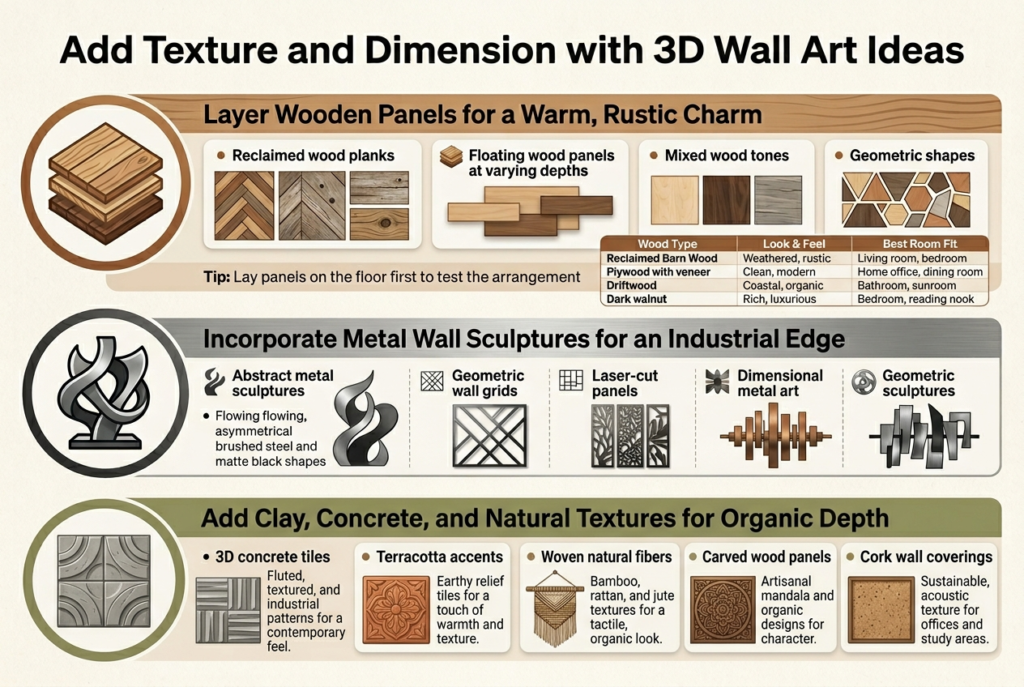
Layer Wooden Panels for a Warm, Rustic Charm
Wooden panels are one of the most underrated 3D wall art ideas out there, and honestly, they deserve way more attention. When you layer different cuts, stains, or even raw, unfinished wood pieces together on a single wall, the result is an incredibly warm, tactile display that no flat print can replicate.
Here are some great ways to pull this off:
- Reclaimed wood planks: Salvaged wood carries natural grain variations, knots, and weathering that give each plank its own personality. Arrange them in a herringbone or chevron pattern for extra visual interest.
- Floating wood panels at varying depths: Mount panels at different distances from the wall using spacers or standoffs. The subtle shadows this creates throughout the day change the mood of the whole room.
- Mixed wood tones: Don’t feel pressured to match everything. Combining light maple with dark walnut or gray driftwood creates a layered, collected-over-time feel that looks intentional and sophisticated.
- Geometric shapes: Cut wood into triangles, hexagons, or irregular polygons and arrange them in a mosaic pattern. This turns simple lumber into a genuine statement piece.
Best Wood Types to Consider
| Wood Type | Look & Feel | Best Room Fit |
| Reclaimed Barn Wood | Weathered, rustic | Living room, bedroom |
| Plywood with veneer | Clean, modern | Home office, dining room |
| Driftwood | Coastal, organic | Bathroom, sunroom |
| Dark walnut | Rich, luxurious | Bedroom, reading nook |
| White pine | Light, airy | Kitchen, nursery |
A simple trick: before permanently mounting anything, lay your panels out on the floor to test the arrangement. This saves you from unnecessary nail holes and lets you tweak the composition until it feels right.
Incorporate Metal Wall Sculptures for an Industrial Edge
Metal wall sculptures bring something genuinely different to a space — they catch light in ways that change depending on the time of day, making your wall art feel almost alive. Whether you prefer polished steel, raw iron, copper, or bronze finishes, metal wall decor works across a surprising range of design styles, from ultra-modern to rustic farmhouse.
What makes metal 3D wall art so effective:
- The way it interacts with natural and artificial light creates shifting shadows and reflections that flat art simply can’t produce.
- Metal pieces tend to feel substantial and permanent, giving a room a sense of weight and intention.
- They age beautifully — patinas, oxidization, and wear actually improve the look over time.
Popular Metal Wall Art Styles to Try
- Abstract metal sculptures: Flowing, asymmetric shapes in brushed steel or matte black make a bold focal point above a sofa or fireplace.
- Geometric wall grids: Flat metal grid panels with an open framework cast incredible shadow patterns and work beautifully as a backdrop for hanging plants or small decorative items.
- Nature-inspired metal art: Trees, birds, leaves, and botanical silhouettes cut from thin metal sheet are endlessly popular because they soften the industrial feel with something organic.
- Typography and quotes: Laser-cut metal letters or words add a personal dimension to your wall while keeping the aesthetic sharp and contemporary.
- Clock and gear designs: Steampunk-inspired arrangements of oversized gears and clock components turn a blank wall into a functional conversation starter.
Mixing Metals Without It Looking Chaotic
A lot of people worry about mixing metal finishes, but it works brilliantly when you follow a simple rule: pick two metals that contrast in tone (like warm copper paired with cool matte black) and let one dominate while the other acts as an accent. Three or more competing finishes in equal proportions tend to feel busy, but a dominant/accent pairing always feels curated.
Pro tip: If your room already has metal elements like light fixtures, cabinet hardware, or furniture legs, echo at least one of those metals in your wall sculpture. That small detail ties the whole room together without any extra effort.
Use Macrame and Woven Pieces to Add Bohemian Depth
Macrame and woven wall hangings are probably the most texture-rich of all 3D wall art options. They bring softness, warmth, and an undeniably handmade quality that makes a space feel genuinely lived-in and loved. The best part? They work beautifully in rooms that already have a lot of hard surfaces — bare walls, wooden floors, concrete accents — because the fibers introduce an entirely different sensory dimension.
Why woven wall art works so well:
- Fiber art absorbs sound, making rooms feel cozier and less echoey.
- No two handmade pieces are identical, so you’re always getting something genuinely unique.
- Macrame and woven pieces can be surprisingly large-scale, filling a feature wall with warmth without the weight of a heavy frame or panel.
- They layer beautifully with other wall decor like mirrors, shelves, and framed prints.
Types of Woven and Macrame Wall Art to Explore
- Classic knotted macrame: Made from cotton or jute rope, traditional macrame wall hangings feature square knots, half hitches, and spiral patterns that create a rich, textured fringe. These are timeless and look incredible in bedrooms and living rooms.
- Woven tapestries: Hand-woven textile pieces that incorporate multiple colors, materials, and weaving techniques. These lean more toward artwork than craft and can be genuinely stunning as a focal point.
- Fiber wall installations: More avant-garde pieces that hang at varying depths from the wall, almost like a three-dimensional textile sculpture. These are perfect for anyone who wants something truly one-of-a-kind.
- Wrapped driftwood hangings: Macrame or weaving techniques combined with a natural driftwood dowel at the top creates a piece that blends organic and handcrafted aesthetics beautifully.
Quick Styling Tips for Macrame and Woven Art
- Size matters: Go bigger than you think you need. A small macrame piece on a large wall looks lost. Aim for something that fills at least a third of the wall space.
- Layer with plants: Trailing plants like pothos or string of pearls placed nearby (or woven into the piece itself) amplify the natural, organic feel.
- Mix materials: Pair a neutral, cream macrame piece with a colorful woven tapestry nearby to create a wall that’s rich in texture but still cohesive.
- Consider height placement: Unlike framed art that traditionally hangs at eye level, macrame pieces often look best when hung higher, allowing the fringe to cascade downward with plenty of breathing room below.
Macrame Material Comparison
| Material | Texture | Durability | Best Placement |
| Cotton rope | Soft, fluffy | Moderate | Bedroom, living room |
| Jute/hemp | Rough, earthy | High | Entryway, dining room |
| Wool | Plush, warm | Moderate | Bedroom, reading nook |
| Recycled yarn | Varied, colorful | Moderate | Kids’ room, studio |
| Linen | Fine, structured | High | Home office, living room |
Whether you buy a stunning handmade piece from an independent maker or take on a DIY wall art project by learning basic knots on YouTube, macrame and woven wall hangings are one of the most rewarding ways to add genuine depth and personality to your home walls.
Personalize Your Walls with Custom and Meaningful Pieces
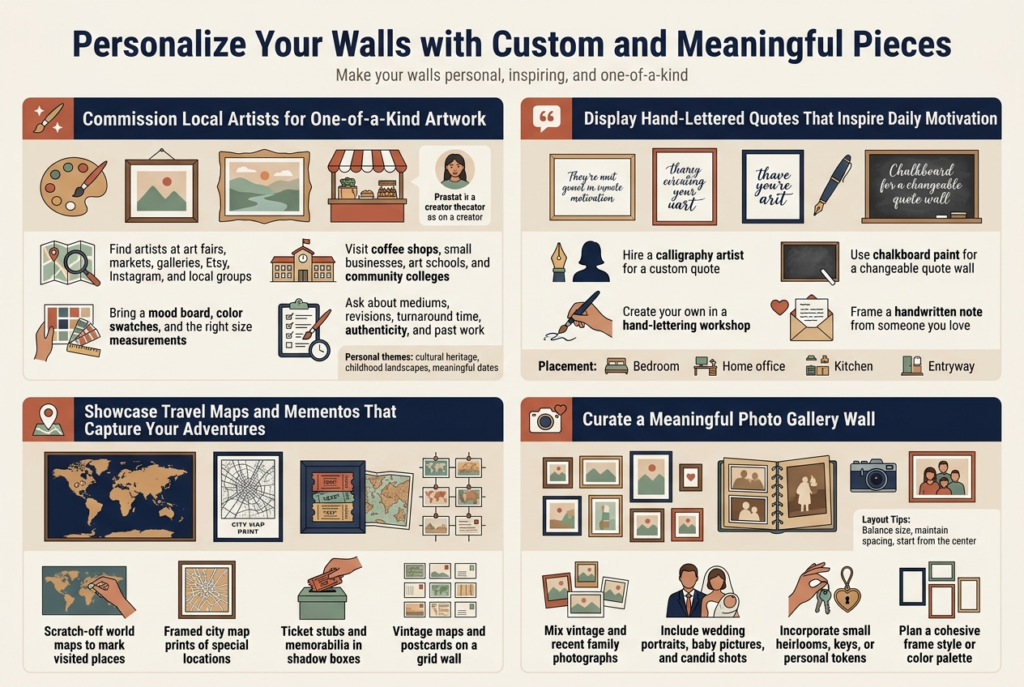
Commission Local Artists for One-of-a-Kind Artwork
There’s something genuinely special about hanging a piece of art on your wall that exists nowhere else in the world. When you commission a local artist, you’re not just buying custom wall decor — you’re investing in a story, a relationship, and a piece that carries real human energy into your home.
How to find and work with local artists:
- Check out local art fairs, markets, and gallery shows in your area
- Browse platforms like Etsy, Instagram, or even Facebook groups dedicated to local creatives
- Visit coffee shops and small businesses that display local artwork — artists often leave business cards nearby
- Reach out to art schools or community colleges where talented emerging artists are always looking for commissions
When you approach an artist, come prepared with a mood board, color swatches from your room, and a clear sense of the size you need. Good artists appreciate direction, but they also need creative breathing room to produce something truly outstanding.
Questions to ask before commissioning:
| Question | Why It Matters |
| What mediums do you work in? | Ensures the piece fits your aesthetic |
| Do you offer revisions? | Protects your investment |
| What’s your typical turnaround time? | Helps you plan around move-in dates or events |
| Do you provide a certificate of authenticity? | Adds long-term value to the piece |
| Can I see past commissioned work? | Gives you confidence in their style |
Don’t be afraid to commission something that reflects a deeply personal theme — your family’s cultural heritage, a beloved landscape from your childhood, or even an abstract interpretation of a meaningful date or feeling. That kind of intentionality transforms a blank wall into something that genuinely moves people when they walk into the room.
Display Hand-Lettered Quotes That Inspire Daily Motivation
Words have power, and when you put the right ones on your wall, they become part of your daily mental landscape. Hand-lettered quotes bring warmth and personality to a space in a way that a printed poster simply can’t replicate. The slight imperfections, the ink variations, the personal touch of someone’s hand — all of that adds up to something that feels alive on your wall.
Ways to incorporate hand-lettered quotes into your home:
- Hire a calligraphy artist to create a custom piece with a quote that holds deep personal meaning to you
- Take a hand-lettering workshop and create your own — even beginners can produce beautiful results with the right guidance
- Use chalkboard paint on a section of wall and update your quote whenever inspiration strikes
- Frame a handwritten note from someone you love — sometimes the most meaningful words are ones already written to you
Choosing the right quote:
Skip the generic “Live, Laugh, Love” territory unless it genuinely speaks to you. Think about what you actually want to feel when you wake up, walk into your kitchen, or sit down at your desk. The best motivational wall art is specific to your life, not a broad cultural default.
Some great sources for meaningful quotes:
- Passages from books that changed your thinking
- Song lyrics that hit differently at a specific moment in your life
- Words from a mentor, parent, or person who shaped who you are
- Quotes from historical figures in a field you’re passionate about
Placement tips for maximum impact:
- Bedroom — Choose something grounding or peaceful, something you want to think about as you fall asleep or wake up
- Home office — Pick something that fires up your ambition and keeps you focused during long work sessions
- Kitchen — Opt for something warm, community-centered, or even a little playful
- Entryway — Set the tone for your entire home with a quote that captures your values
Showcase Travel Maps and Mementos That Capture Your Adventures
If your walls could tell the story of everywhere you’ve been and everywhere you’re going, how incredible would that be? Travel-inspired wall art is one of the most personal and visually dynamic ways to decorate, and it goes way beyond pinning a generic world map print from a big-box store.
Unique wall art ideas for travel lovers:
- Scratch-off world maps — Mark off countries and regions as you visit them; it becomes a living, evolving piece of art
- Custom city maps — Order prints of the exact coordinates and street layout of cities that hold deep meaning for you — the city where you met your partner, grew up, or had a transformational experience
- Framed ticket stubs, boarding passes, and receipts — Arrange them in a shadow box or flat frame for a memory-packed collage
- Vintage maps — Antique-style maps from specific eras give walls a rich, layered, intellectual feel
- Postcards from your travels — Create a grid display using matching frames for a cohesive, gallery-worthy look
Building a travel gallery wall:
Start with a large anchor piece — a map, a big photograph, or a canvas print — and build outward from there with smaller complementary items. Mix framed photographs you took personally with found objects, small prints, and handwritten journal entries you’ve had professionally printed. The result is a gallery wall that no one else on earth could replicate, because it’s built entirely from your experiences.
Pro tips for pulling it together:
- Stick to a cohesive color palette (even vintage maps, mementos, and modern prints can coexist when you unify them through frames or matting)
- Use frames in two or three complementary finishes rather than a chaotic mix of everything
- Leave intentional gaps for future mementos — your travel wall should grow with you over time
- Add small 3D elements like a tiny souvenir, a pressed flower from a hiking trail, or a small compass to add depth and texture
Create a Vision Board Wall That Fuels Your Goals and Dreams
A vision board wall takes the classic vision board concept and scales it up into something that becomes a permanent, immersive feature of your living or working space. Rather than a poster board you tuck under your bed, this is a dedicated wall that keeps your goals front and center every single day.
Why a vision board wall works:
The psychology behind visualization is well-documented — surrounding yourself with images, words, and symbols that represent your goals primes your brain to recognize opportunities and stay motivated. A wall-sized version amplifies that effect because you can’t ignore it. It’s there every morning, every evening, and every time you need a reminder of what you’re working toward.
How to design your vision board wall:
- Choose your wall — Pick one that you see often, ideally your bedroom or home office. Avoid high-traffic public spaces if your goals feel private
- Define your categories — Career, relationships, health, travel, personal growth, finances, creativity — decide what areas of your life you want to represent
- Gather your materials:
- Magazine cutouts
- Printed photographs
- Handwritten affirmations
- Inspirational quote cards
- Fabric swatches, color samples, or small objects
- Screenshots printed on quality paper
- Magazine cutouts
Display options to consider:
| Display Method | Best For | Vibe |
| Corkboard panels | Easy swapping and updating | Casual, flexible |
| Wire grid with clips | Minimalist, modern look | Clean, contemporary |
| Magnetic wall paint | Seamless, no-hole solution | Sleek, intentional |
| Gallery wall frames | Polished, permanent display | Curated, sophisticated |
| Pegboard system | Layered, dimensional display | Creative, eclectic |
Keeping it fresh and aligned:
The biggest mistake people make with vision board walls is building them once and never revisiting them. Carve out time every three to six months to edit, remove things that no longer resonate, and add new imagery that reflects where your goals have evolved. A vision board wall that grows with you stays powerful — one that stays static eventually fades into background noise.
Also consider layering in home wall decoration ideas that double as vision elements — a framed piece of artwork from an artist you admire (because you want to collect more of their work someday), a map of a country you’re planning to visit, or a print of an architectural style you want to live in one day. When your decor and your goals overlap, your entire space becomes a reflection of who you’re becoming.
Embrace Seasonal and Trending Wall Art Styles
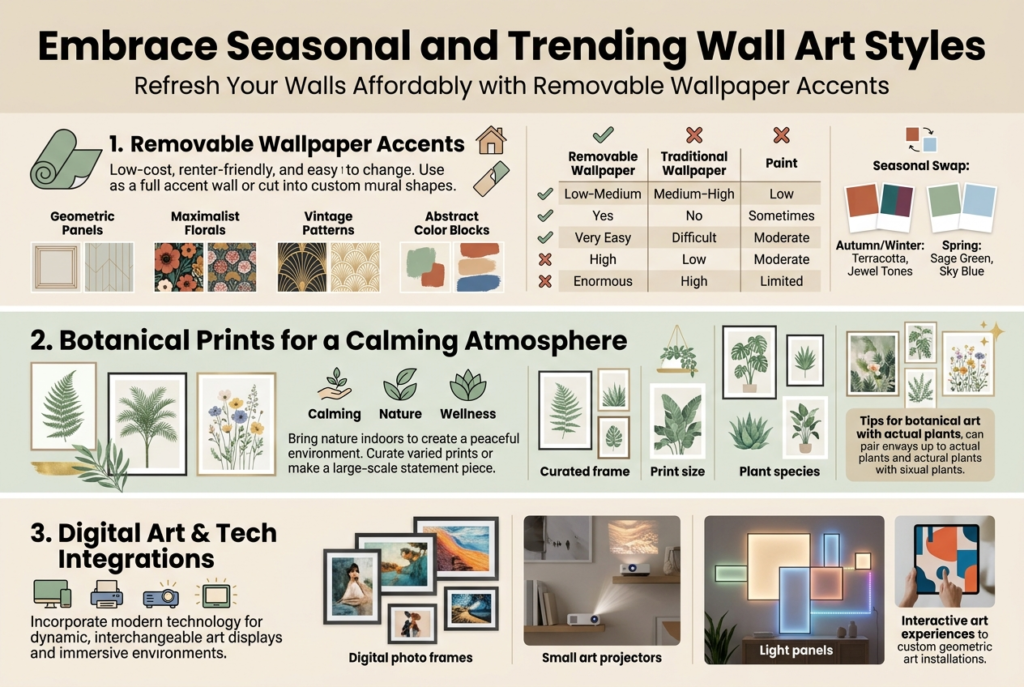
Refresh Your Walls Affordably with Removable Wallpaper Accents
Trending wall art styles don’t have to mean permanent commitments or expensive renovations. Removable wallpaper has completely changed the game for renters and homeowners alike, giving you the freedom to switch up your space whenever the mood strikes — no damage, no drama.
The beauty of removable wallpaper accents is how they pull double duty. You can use them as a full accent wall behind your bed or sofa, or cut them into shapes and patterns to create a custom mural effect. Some popular ways people are using removable wallpaper right now include:
- Geometric accent panels framed with thin molding to look like built-in architectural details
- Maximalist floral prints as a focal point in an otherwise neutral room
- Vintage-inspired patterns like Art Deco fan prints or retro mid-century designs
- Abstract color block sections that mimic high-end painted murals
Here’s a quick look at how removable wallpaper stacks up against traditional wall decoration options:
| Feature | Removable Wallpaper | Traditional Wallpaper | Paint |
| Cost | Low–Medium | Medium–High | Low |
| Renter-Friendly | ✅ Yes | ❌ No | Sometimes |
| Easy to Change | ✅ Very Easy | ❌ Difficult | Moderate |
| Trend Flexibility | ✅ High | ❌ Low | Moderate |
| Design Variety | ✅ Enormous | ✅ High | Limited |
Switching out your removable wallpaper seasonally is one of the easiest home wall decoration ideas you can try. Go for warm terracotta tones and moody jewel hues in autumn and winter, then swap to soft sage greens and sky blues when spring rolls around.
Incorporate Nature-Inspired Botanical Prints for a Calming Effect
Botanical prints have been trending for a while now, and honestly, they’re not going anywhere soon — and for good reason. There’s something about bringing the outside in that instantly makes a room feel more grounded and peaceful. Whether you live in a city apartment or a countryside cottage, nature-inspired wall art works beautifully in almost any setting.
Why Botanical Prints Work So Well
The soft color palettes in botanical art — think dusty greens, warm creams, terracotta, and earthy browns — blend seamlessly with both warm and cool interior schemes. They add visual interest without overwhelming a space, making them a smart choice if you want unique wall art that still feels timeless.
Here are some popular styles of botanical prints to consider:
- Vintage herbarium illustrations — detailed, scientific-style drawings of plants with handwritten labels; perfect for study rooms or libraries
- Tropical leaf prints — bold monstera and palm frond artwork that brings a lush, vacation-like energy
- Pressed flower art — actual dried and pressed flowers framed behind glass for a deeply personal, tactile touch
- Watercolor botanicals — soft, painterly plant illustrations with a dreamy, artistic quality
- Black and white line botanical drawings — clean and modern, great for minimalist spaces
How to Style Botanical Prints Effectively
Grouping botanical prints together in a gallery wall arrangement is one of the most popular home wall decoration ideas right now. Stick to one consistent frame color — black, white, or natural wood all work well — and mix different sizes for a relaxed, curated look.
You can also use a single oversized botanical print as large scale wall art to make a dramatic yet serene statement. A giant fiddle leaf fig illustration or a sweeping tropical leaf print in a simple frame can become the centerpiece of an entire room without feeling too loud or aggressive.
Pairing suggestions by room:
| Room | Best Botanical Style | Frame Recommendation |
| Bedroom | Soft watercolor florals | Light wood or white |
| Kitchen | Herb and vegetable prints | Black or brass |
| Bathroom | Tropical leaves | Sleek black metal |
| Living Room | Large fern or palm fronds | Natural wood or gallery white |
| Home Office | Vintage herbarium prints | Dark walnut or antique gold |
If you want to keep costs down, free botanical print downloads are widely available online. Simply print them at home or through a local print shop, pop them into frames, and you’ve got affordable, beautiful wall art in minutes.
Explore Minimalist Line Art for a Clean, Modern Aesthetic
Minimalist line art is one of the most searched trending wall art styles right now, and it’s easy to understand why. A single continuous line drawing — whether it’s a face, a figure, a flower, or an abstract shape — carries so much elegance with barely any visual noise. It’s the definition of less being more.
What Makes Line Art So Appealing
Line art sits comfortably in that sweet spot between art and design. It feels intentional without being complicated, which is exactly what modern interiors are after. It works in virtually any room, scales beautifully from small prints to large scale wall art, and pairs well with almost any color scheme.
Key characteristics of minimalist line art that people love:
- Single continuous line drawings — one unbroken line creates a complete image, usually a portrait, animal, or nature element
- Abstract line compositions — free-flowing shapes and curves that suggest movement and emotion without depicting anything literal
- Figure and body sketches — elegant, simple human forms that feel artistic and sophisticated without being overtly complex
- Geometric line patterns — precise, angular compositions that feel very architectural and clean
DIY Line Art: Create Your Own Custom Wall Decor
One of the best things about this style is that it’s genuinely approachable as a DIY wall art project, even if you don’t consider yourself artistic.
Here’s a simple way to create your own minimalist line art at home:
- Choose your subject — a simple silhouette, a flower, or even your pet’s face works great
- Find a reference image and print or project it onto paper
- Trace the outline using a single flowing line, keeping your pen moving without lifting it (this is the classic “continuous line” technique)
- Scan or photograph your drawing and print it at your desired size
- Frame it in a simple black, white, or natural wood frame
The result looks high-end and intentional at a fraction of what you’d pay for framed artwork for walls in a boutique store.
Sizing and Placement Tips for Line Art
| Placement | Recommended Size | Impact |
| Above a desk or small shelf | 5×7″ or 8×10″ | Subtle, personal touch |
| Bedroom gallery wall | Mix of 8×10″ and 11×14″ | Cohesive and curated |
| Living room focal point | 18×24″ or larger | Bold, modern statement |
| Bathroom accent | 4×6″ or 5×7″ | Clean and spa-like |
When grouping multiple line art pieces together, repetition is your friend. A set of three matching line drawings — same frame, same style, evenly spaced — creates an incredibly polished look that feels deliberately designed rather than randomly assembled. Choose subjects that relate to each other, like three different flower varieties or three abstract facial profiles, for a small space wall art approach that still punches above its weight visually.
Maximize Small Spaces with Smart Wall Art Strategies
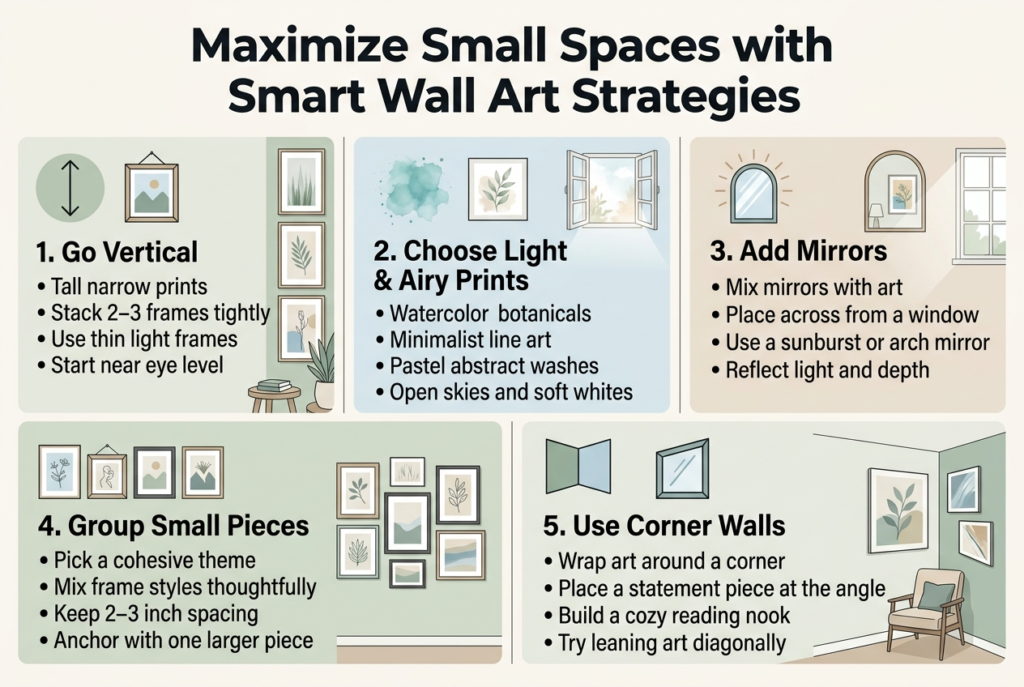
Use Vertical Art Arrangements to Make Ceilings Feel Taller
One of the sneakiest tricks in small space wall art is going vertical. When you hang artwork in tall, narrow arrangements — think a single tall piece or a stacked column of two or three prints — your eye naturally travels upward. That upward movement makes the ceiling feel higher than it actually is, which instantly makes the room feel bigger and more open.
For the best effect, try these approaches:
- Hang a tall, narrow print that reaches from about eye level up toward the ceiling. Abstract artwork, botanical illustrations, or simple line art work beautifully in portrait orientation.
- Stack two or three smaller framed pieces vertically with just a couple of inches between them. Keep the spacing tight so the eye reads them as one cohesive column rather than separate pieces.
- Choose frames with thin borders in lighter colors. Chunky, dark frames can feel heavy and actually drag attention downward.
- Anchor the arrangement by starting the bottom piece at or just below eye level, then let the stack climb upward.
A single tall piece of large scale wall art — even in a small room — can work wonders. Don’t be afraid to go big vertically. People often assume small spaces need small art, but that thinking is exactly what makes rooms feel cramped.
Choose Light and Airy Prints to Open Up Tight Spaces
The artwork you choose for a small room does a lot of heavy lifting beyond just decoration. Dark, busy, or heavily detailed prints can feel like they’re closing in on you, while light and airy prints do the opposite — they make a small space breathe.
Here’s what to look for when picking prints for tight spaces:
| Art Style | Effect on Small Spaces |
| Watercolor botanicals | Soft and dreamy, adds airiness |
| Minimalist line art | Clean and open, doesn’t overwhelm |
| Abstract washes in pastels | Adds color without visual noise |
| Landscape prints with open skies | Creates a sense of depth and distance |
| Black and white photography | Timeless, but choose simple compositions |
Color matters a lot here. Prints with lots of white space, soft blues, pale greens, and warm whites tend to open up a room visually. Avoid artwork that’s very dark, heavily saturated, or packed with intricate detail — at least as the dominant piece on the wall.
Subject matter plays a role too. Open landscapes, ocean scenes, simple florals, and abstract pieces with breathing room all suggest space and lightness. Even a simple minimalist print with a single line drawing can make a small wall feel open and considered rather than cluttered.
If you love bold art but have a small space, try placing one statement piece with lighter, simpler prints around it. That way you get personality without overwhelming the room.
Combine Mirrors with Art to Reflect Light and Add Depth
Mixing mirrors into your wall art arrangement is one of the most effective home wall decoration ideas for small spaces. Mirrors do two things that artwork alone can’t — they bounce light around the room and create the illusion of extra depth by essentially “doubling” the space visually.
Here are some great ways to combine mirrors with art:
- Create a gallery wall that includes one or two mirrors alongside framed artwork. Choose mirrors with decorative frames that complement your art frames for a cohesive look. The mirrors don’t need to be large — even small decorative mirrors act as light catchers.
- Place a mirror directly across from a window. When you pair this with wall art on adjacent walls, the mirror reflects natural light across the whole arrangement and makes everything feel brighter.
- Use a sunburst or arch mirror as the focal point of a small art arrangement. Build a collection of smaller prints or photographs around it. The mirror acts as an anchor while the artwork adds personality.
- Try a leaning mirror alongside a small art grouping. If you don’t want to commit to wall mounting, a leaning mirror next to a small piece of framed artwork creates a casual, layered vibe.
Quick tip: When placing mirrors near art, think about what the mirror will reflect. Ideally it should reflect a window, a beautiful lamp, or another area of the room — not a blank wall or a cluttered corner.
Group Small Pieces Together for a Curated, Collected Look
Small individual prints can look a little lost on a wall, especially if the room already has limited space. But group those same small pieces together and suddenly they feel intentional, curated, and full of personality. This is the magic of the gallery wall, and it’s one of the best small space wall art strategies out there.
How to build a great small-piece grouping:
- Start with a cohesive theme or color palette. Your pieces don’t all need to match, but they should feel like they belong together. Try sticking to two or three colors, or a shared subject matter like botanicals, travel photography, or abstract prints.
- Mix frame styles thoughtfully. A mix of thin black frames, natural wood frames, and maybe one or two white frames can look eclectic and interesting. Too many different frame styles can feel chaotic.
- Lay it out on the floor first. Arrange your grouping on the ground before putting a single nail in the wall. This saves a lot of patching and repainting later.
- Keep spacing consistent. About 2–3 inches between pieces tends to look clean and intentional. Wider gaps can make the grouping feel disjointed.
- Anchor with one slightly larger piece. Even in a group of small prints, having one piece that’s slightly bigger than the rest gives the arrangement a natural focal point.
Ideas for small pieces that group beautifully together:
- Postcard-sized botanical illustrations
- Small black and white photographs
- Miniature abstract prints
- Pressed flower frames
- Small typography or quote prints
- Tiny landscape sketches
A well-curated grouping of small prints can carry just as much visual weight as one large piece — and it tells a much richer story about your taste and personality.
Utilize Corner Walls to Add Unexpected and Charming Displays
Corners are some of the most overlooked real estate in a home. Most people ignore them entirely, leaving them empty and awkward. But corners are actually perfect spots for creative, unexpected wall art displays — especially in small spaces where every inch counts.
Why corners work so well for art:
- They naturally draw the eye because they’re where two walls meet, creating a visual anchor point
- Art placed in or near corners feels like a discovery, giving your space a sense of depth and surprise
- Corner displays add dimension without eating into the visual space of a main wall
Great ways to use corner walls for wall art:
- Wrap a gallery arrangement around a corner. Start a small grouping on one wall and let it turn the corner onto the adjacent wall. This technique makes a space feel layered and full without ever feeling cluttered.
- Hang a single statement piece right at the corner angle. A tall, narrow print or a vertical canvas placed close to where two walls meet creates a cozy, tucked-in feel that’s both charming and intentional.
- Create a reading nook or cozy corner with art. If you have a small chair or bench in a corner, build a small art arrangement above and around it. Keep the pieces personal — small framed photos, a little map, a beloved print — and the corner becomes a whole little world.
- Use corner shelves with small framed pieces. Corner floating shelves with tiny framed artwork, small plants, and objects create a three-dimensional display that’s far more interesting than flat wall art alone.
- Try diagonal placement. Leaning a framed piece against the corner at a slight angle rather than hanging it flush against one wall gives the display an effortless, casual energy.
Don’t underestimate corners. In small spaces especially, they’re hidden opportunities to add character, depth, and some of the most charming unique wall art moments in your entire home.
Your walls have so much potential, and these 33 ideas are proof that you don’t need a big budget or a design degree to make them look amazing. From framed artwork and DIY projects to bold large-scale pieces and 3D textures, there’s something here for every style, space, and personality. The key is to choose pieces that actually mean something to you, whether that’s a custom family portrait, a trending maximalist gallery wall, or a simple seasonal swap that keeps things feeling fresh.
Don’t let blank walls stress you out — think of them as a blank canvas just waiting for your personal touch. Start with one wall, one idea, or even one frame, and go from there. Small spaces can shine just as bright as large ones when you use the right strategies. So pick your favorite idea from this list and get started — your walls are ready for their glow-up.